
I’ve been coveting the Making Backpack by noodlehead ever since I saw it in a preview of making, I thought my biggest hurdle was going to be remembering where the heck I put my rivets, never did I suspect the zipper tangle to be lacking in 8 inchers.
(There is just something about Anna’s patterns that inspire me, sadly it’s not often anymore that I see something so stand out that I NEED to make it right away, but twice now I’ve had it happen from this publication. Last time it was the sweet Petal Pouch, which is now offered as a stand alone pattern from her website!)

I’ve been wanting a yellow bag for a while, my current carry was a ready made grey yoga tote with a yellow interior (my bags are ridiculously huge, over the years the cute little handbags and purses I used to carry, have morphed into a giant tote that I can cram my entire life into).
I found the perfect duck canvas in the most impressive mustard color and if not for this sewing pattern and a strong desire to make something that fits my needs exactly, I might have fallen for one of those cute pricey swedish backpacks. But really I don’t like backpacks, so I switched up the backpackness of this and made it into a handled bag, folding over and stitching the webbing where my hands would grab, then running some cotton cording through the channel created to make it a rounded grip.

I also added a few more pockets for my crafty makers heart 💛 I didn’t stitch down the top of the front pocket (on the outer edge of the rivets), instead I topstitched roughly 5″ down to create two little slim pockets on either side, you know for pens, crochet hooks or my knitting needles.
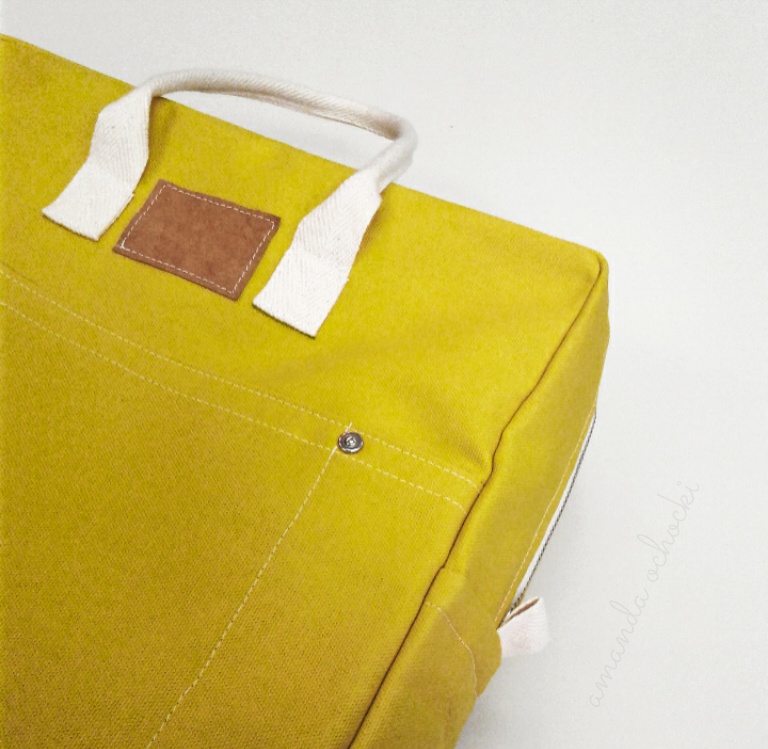
I used a material called washable paper as a leather alternative for the leather patch, it looks/wrinkles like real leather, you can wash it, iron it, stamp and draw on it, it’s easy to cut and sew, and the best part of this fabric is, it’s a plant based renewable resource.

Because I wasn’t making it a backpack, I put another pocket on the backside, using the same dimensions as the front pocket, minus rivets and all the topstitching. I like lots of places for notebooks or other 8½” x 11″ things.

I chose a heavyweight linen for the lining, I’m not crazy about using interfacing (I can’t ever seem to get a clean result with the iron on kind), but I still wanted decent structure and a bag that stood on it’s own, so I used heavyweight fabrics inside & out instead. (Waxed canvas would be AWESOME!)

I trimmed the raw edges with the cutest yellow bias tape.

Best of all, I made it to match my planner ..ooof so so good!
… Things To Note …
Use a denim or leather needle (I used a 90/14), you don’t want to keep breaking needles ..why did it take me so long so long to understand this?
I went through an entire full bobbin plus some, so wind two!
If you’re using a contrasting color for the topstitching, go slow, any wobbly wonky movements will be amplified by that stark thread!
Use a sturdy thick webbing for the handles and straps, packs get pretty heavy and you want to be comfortable carrying or wearing it. I’m going to make an adjustable crossbody/shoulder strap that will attach to the webbing loops at the ends of the zipper, just waiting on D rings and clips :)
My next one might have more interior pockets and pouches, I feel like I still need to use a bag organizer inside. One pocket for all my bits is not enough.
This was pretty straight forward sewing, if you have some experience with zippers and bias tape you can totally do this! Even if you don’t and really really want one, you can totally do this! You don’t have to inset a zip on the inside if you don’t want to, or use rivets, or even finish the inside edges with bias, a zigzag or overlock stitch would work too.
I’ll be honest this took several hours to make (with a big fat bold line under several). Between cutting and recutting (because apprently I can’t follow directions or read measurements), taking it super slow and pinning everything so I didn’t f -up the “good” fabric, and having to rip out my zipper top stitching twice because I blinked. Yes, I started straight off with the good stuff, I wanted this bag SO BAD and if it completely sucked making it, I only wanted to have to do it once! It didn’t suck at all, it was really engaging and enjoyable.
💕

It is beautiful, Amanda! Have you made one of Anna’s “Maker’s Totes”? They are perfect for small projects. I made mine with a linen fabric that has sheep on it, and it’s one of my very favorite possessions.
LikeLike
Ooooo I haven’t, I love the doctors bag look of it! 😍 Thank you for sharing, I will have to add it to my list of must makes. Nothing’s better than a fantastic favorite bag!
LikeLike
Thanks for explaining all the tips and tricks you used, they will come in handy once I collect all the supplies 😘🙏💛
LikeLike
Are uou thinking of making a full on backpack?!? 😍 I can’t wait to see!
LikeLike
Your bag is seriously yummy….love the color. And the lining!.I’ve been looking at my little vintage Singer and wondering if she misses the things we used to make. Probably. This bag (or a similar one) may just have set me off in a new direction!
Julie
LikeLike
Oh lucky you, to have a little vintage Singer! Yes, I’m pretty sure she misses you 😙 and a cute tote is a perfect place to get to know eachother again!
LikeLike