I kind of have a slight obsession with miniature, I always fall for things that are teeny replicas of a larger something, like little teacups & tiny tin kitchen sets. I guess I also really love it when something that’s normally small, is blown up to huge proportions, pencils, toothbrushes ..remember the giant swatch wristwatch wall clocks of the 90’s. Swoon.

I’ve been having the urge to play with scale in my knitting as well, I just finished up a teeny version of the nineteen hundred house in #10 cotton thread on 000 needles, it didn’t get as little as I wanted (postage stamp size) but to get it to that size, I think I would’ve had to knit with sewing thread and use straight pins as my needles ..no thanks. Still, it turned out so small & sweet!
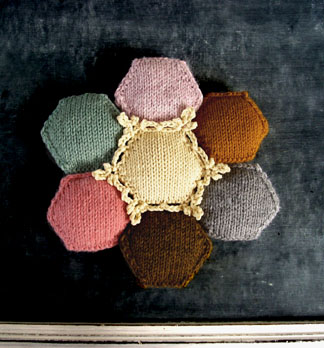
Also in trying to keep my motivation charged up on my beekeeper’s quilt, in addition to having a serious longing for cooler temps, I’ve worked out a snowflake honeycomb! Again playing with the normal scale of something as tiny and lovely as a little snowflake, making it big and grand in a pale yellow yarn. Yes I made a yellow snowflake, but not on purpose, it was just the color I was working on next in the quilt when the idea hit!
Would you like to learn how to make a lovely snowflake edging on your honeycombs?
What you need to do:
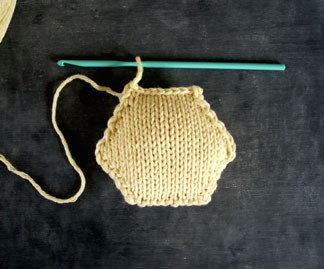
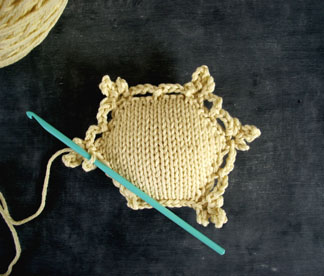
When you’ve finished your honeycomb puff & you’ve bound off, DON’T CUT YOUR YARN! You will have the last bind off loop remaining on your hook (If you’ve done a knitted bind off, just slip out your needle and insert a crochet hook) I used a 3.5mm hook.
(you could start with an already finished puff too, just join your yarn to a corner and start the snowflake edging)
Now you’re going to start to work a crochet edging around your honeycomb, it’s basically a cluster of 3 picots on the puffs corners & chains on the side edges of the puff, as follows:
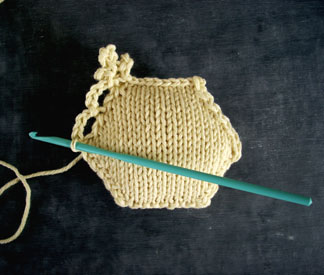
Ch3, slst in first ch of ch 3 (picot made)
Ch6, slst in first ch of ch 6 (picot made)
Ch3, slst in first ch of ch 3 (picot made)
Slst in next sc on the body of your honeycomb
This is your first 3 picot snowflake cluster on the corner of your honeycomb puff.
Ch 4, skip next 4 sc on the side edge of your puff, slst in next sc on the side edge.
(this will put you smack dab in the middle on the side of your puff, if your stitches are slightly off, its OK you don’t have to skip exactly 4 just as long as you slst relatively close to the middle on the side of your puff, it will look perfect!)
This is the chain, slst, chain that will get you from one 3 picot cluster corner to the next.
Ch 4, skip next 4 sc on side edge of your puff, slst in next sc (you should be at the corner point of your puff now)
Repeat the 3 picot cluster & chain, slst, chain series, 5 more times around the outside of your honeycomb puff. Join the last ch4 with a slst at the base of your very first picot cluster.

You can attach this into your beekeepers quilt like normal and let the scallops of the flake overlap onto the other honeycombs. OR you can make it an enchanting seasonal ornament/gift topper. Leave it plain or stitch on your favorite chart!

(If you are going to go for the ornament/topper, please make ONE of your ch 6 corner loops, a ch14 so it will create a larger loop perfect for hanging)
I hope you like it, let it snow!

That is the cutest, teensiest house I’ve ever seen! It would make an excellent tree ornament!!
LikeLike
Awesome! I love snowflakes. I love little things/miniatures. I love knitting. Thanks for sharing and being so creative!
LikeLike
i need to figure out crochet now. this is too cute.
LikeLike
I am forever indebted to you for this infraotmion.
LikeLike
These are so lovely! Thanks so much for sharing this design. I can see my beekeeper just full of lacy little snowflake hexapuffs.
LikeLike
Just love it! Thank you so much!
LikeLike
💕 thank you!
LikeLike